
35 posts tagged with "KubeEdge"

View All Tags

· 13 min read

This blog introduces how to enable comprehensive embodied intelligence benchmarking for industrial manufacturing using the KubeEdge-Ianvs framework.

Why Embodied Intelligence Benchmarking for Industrial Manufacturing?

The manufacturing industry is experiencing a profound transformation driven by intelligent robotics, adaptive production lines, and precision assembly systems. Modern industrial environments demand more than basic task execution,they require multimodal perception, force-controlled manipulation, and real-time quality verification integrated into cohesive workflows.

A First-of-Its-Kind Benchmark Addressing Critical Gaps

Despite growing interest in Embodied Intelligence for manufacturing, the research community faces a critical shortage of benchmarks that evaluate real-world industrial assembly scenarios. Existing work falls short in several key areas:

Current Limitations in the Field:

  • Isolated Task Focus: Popular benchmarks like YCB and OCRTOC evaluate individual capabilities (grasping, object detection) but don't assess how these integrate in multi-stage industrial workflows
  • Missing Deformable Component Coverage: While NIST has developed benchmarks for rigid components and simple deformable objects (cables, belts), existing datasets don't support multiple representations of deformable objects with different self-occlusions typical in manufacturing PubMed Central
  • No Electronic Assembly Benchmarks: Despite datasets for PCB defect detection (BoardVision, FICS-PCB) and component recognition (ElectroCom61), none evaluate robotic assembly of electronic components, particularly those requiring precision force control
  • Academic-Industry Gap: A large gap exists between embodied AI in academic research and what manufacturers can feasibly implement National Institute of Standards and Technology, with limited benchmarks that mirror real production challenges

What Makes This Project Unique:

This work represents the first comprehensive benchmark for robotic assembly of deformable electronic components,a scenario ubiquitous in modern electronics manufacturing yet completely absent from existing research infrastructure. Our contributions are unprecedented in scope:

  1. First Multimodal Industrial Assembly Dataset: To our knowledge, no publicly available dataset combines RGB-D vision, force/torque sensor data, and robot trajectories for electronic component assembly.

  2. First Deformable Electronics Benchmark: Existing deformable object benchmarks focus on textiles (GarmentLab), food items, or abstract shapes. This is the first benchmark specifically designed for deformable electronic components like flexible circuits and memory modules,components that require both precision alignment and compliance control.

  3. First End-to-End Assembly Workflow Evaluation: Unlike fragmented benchmarks that test perception OR manipulation OR verification separately, we evaluate complete assembly pipelines. This mirrors how industrial systems actually operate, where failure in any stage cascades to overall task failure.

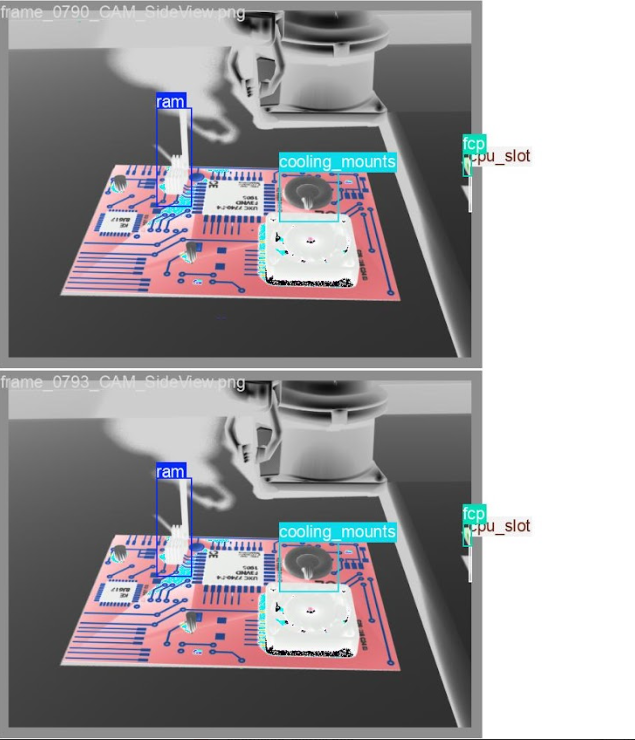
  4. Practical Manufacturing Relevance: Our five assembly scenarios (RAM modules, cooling mounts, CPU sockets, flexible circuits, security chips) represent actual production challenges in electronics manufacturing,an industry segment worth over $2 trillion globally that currently relies heavily on manual assembly due to lack of validated automation solutions.

Addressing Real Industrial Needs

The electronics manufacturing sector faces mounting pressure to automate assembly operations involving:

  • Sub-millimeter positioning tolerances (CPU socket assembly: 55% accuracy in our baseline)
  • Deformable components requiring force adaptation (flexible circuits: 70% accuracy baseline)
  • Quality verification at component scale (current detection: 91.19% mAP50)

Manufacturers need streamlined ways of assessing the productive impact of AI systems through AI-specific productivity metrics and test methods National Institute of Standards and Technology. This benchmark directly addresses that need by providing:

  • Realistic Industrial Scenarios: Deformable component assembly representing real manufacturing challenges
  • Comprehensive Multimodal Dataset: RGB-D images, force/torque sensor data, and robot trajectories,the complete sensor suite used in production environments
  • End-to-End Evaluation: Metrics that assess entire workflows, not just individual subtasks, revealing integration challenges invisible to component-level testing
  • Reproducible Infrastructure: Standardized test environments and baseline algorithms that enable fair comparison across different robotic systems

By combining distributed AI benchmarking framework KubeEdge-Ianvs with this domain-specific industrial dataset, we enable objective comparison of robotic systems on tasks that mirror real-world manufacturing complexity,bridging the gap between academic research and industrial deployment while accelerating the development of reliable autonomous assembly systems.


deformable-component-manipulation

How to Enable Embodied Intelligence Benchmarking with KubeEdge-Ianvs

The following procedures set up a complete benchmarking environment for industrial assembly tasks using KubeEdge-Ianvs with custom multimodal datasets.

After completing these steps, you'll have a fully operational benchmark capable of evaluating multi-stage robotic assembly workflows.

Contents:


Prerequisites

System Requirements:

  • One machine (laptop or VM) with 4+ CPUs
  • 8GB+ RAM (depends on simulation complexity)
  • 20GB+ free disk space
  • Internet connection for downloads
  • Python 3.8+ installed (Python 3.9 recommended)
  • CUDA-capable GPU recommended for YOLOv8 (optional but accelerates training)

Knowledge Requirements:

  • Basic understanding of Python and machine learning
  • Familiarity with robotic manipulation concepts
  • Understanding of computer vision fundamentals

Note: This benchmark has been tested on Linux platforms. Windows users may need to adapt commands accordingly.


Ianvs Installation

1. Download the Ianvs codebase

git clone https://github.com/kubeedge/ianvs.git
cd ianvs

2. Create and activate a virtual environment

sudo apt-get install -y virtualenv
mkdir ~/venv
virtualenv -p python3 ~/venv/ianvs
source ~/venv/ianvs/bin/activate

3. Install system dependencies and Python packages

sudo apt-get update
sudo apt-get install libgl1-mesa-glx -y
python -m pip install --upgrade pip

python -m pip install ./examples/resources/third_party/*
python -m pip install -r requirements.txt

4. Install benchmark-specific requirements

pip install -r examples/industrialEI/single_task_learning_bench/deformable_component_manipulation/requirements.txt

5. Install Ianvs

python setup.py install  
ianvs -v

If the version information prints successfully, Ianvs is ready to use.


Dataset Setup

The Deformable Component Assembly Dataset is a comprehensive multimodal dataset specifically designed for industrial assembly benchmarking. It contains:

  • RGB and depth images from simulated PyBullet cameras
  • Force/torque sensor data from robot wrist measurements
  • YOLO-format annotations for object detection training
  • Assembly success/failure labels for end-to-end evaluation
  • Robot trajectory logs capturing full motion sequences

Download the Dataset

Access the dataset from Kaggle:

# Download from: https://www.kaggle.com/datasets/kubeedgeianvs/deformable-assembly-dataset

mkdir -p /ianvs/datasets
cd /ianvs/datasets

Transfer the downloaded .zip file to the datasets folder and extract:

unzip deformable_assembly_dataset.zip

Dataset Structure

The dataset contains 2,227 frames across 5 episodes, each focusing on different component types:

deformable_assembly_dataset/
├── episodes/
│ ├── episode_001_ram/ # 451 frames - RAM module assembly
│ │ ├── images/
│ │ │ ├── rgb/ # RGB camera frames
│ │ │ ├── depth/ # Depth maps
│ │ │ └── segmentation/ # Segmentation masks
│ │ ├── labels/ # YOLO format annotations
│ │ ├── sensor_data/ # Force/torque logs
│ │ │ ├── force_torque_log.csv
│ │ │ └── robotic_arm_poses.csv
│ │ └── metadata/
│ ├── episode_002_cooling_mounts/ # 400 frames
│ ├── episode_003_cpu_slot/ # 400 frames
│ ├── episode_004_fcp/ # 400 frames - Flexible circuits
│ └── episode_005_chip_key/ # 577 frames
├── index/ # Train/test splits
│ ├── train_index1.txt
│ ├── test_index1.txt
│ └── ...
└── dataset_info.json

Each episode represents a distinct assembly challenge:

EpisodeComponentFramesChallenge
1RAM451Memory module alignment and insertion
2Cooling Mounts400Thermal component placement
3CPU Slot400Processor socket assembly
4FCP400Deformable circuit handling
5Chip Key577Security chip installation

Total Dataset Size: ~830 MB


Benchmark Configuration

The benchmark is organized following the Ianvs framework structure:

ianvs/examples/industrialEI/single_task_learning_bench/
└── deformable_assembly/
├── testalgorithms/
│ └── assembly_alg/
│ ├── components/
│ │ ├── perception.py # YOLOv8 detection + CNN inspection
│ │ └── manipulation.py # Force control algorithms
│ ├── testenv/
│ │ ├── acc.py # End-to-end metrics
│ │ └── testenv.yaml # Environment configuration
│ └── naive_assembly_process.py # Workflow orchestration
├── benchmarkingjob.yaml
└── README.md

Configure Dataset Paths

The dataset path is pre-configured in testenv.yaml. Set up the algorithm path:

export PYTHONPATH=$PYTHONPATH:/ianvs/examples/industrialEI/single_task_learning_bench/deformable_assembly/testalgorithms/assembly_alg

The configuration defines the complete test environment including:

  • Dataset locations and splits
  • Simulation parameters
  • Sensor configurations
  • Performance metrics

Algorithm Integration

The benchmark implements a multi-stage single-task paradigm that orchestrates three sequential modules:

1. Perception Module (perception.py)

Uses YOLOv8 for real-time component detection:

  • Identifies component locations on the assembly panel
  • Provides bounding boxes with confidence scores
  • Extracts orientation information for grasping

2. Manipulation Module (manipulation.py)

Implements force-controlled assembly operations:

  • Executes precise grasping based on detection results
  • Uses haptic feedback for delicate component handling
  • Adapts to deformation during flexible circuit placement
  • Monitors force/torque to prevent damage

3. Verification Module (perception.py)

CNN-based visual quality inspection:

  • Captures final assembly state
  • Detects misalignments and defects
  • Generates pass/fail classifications

The entire workflow is orchestrated by naive_assembly_process.py, which executes these stages sequentially for each component type.


Run Benchmarking

Execute the benchmark from the Ianvs root directory:

cd /ianvs
ianvs -f examples/industrialEI/single_task_learning_bench/deformable_assembly/benchmarkingjob.yaml

The benchmark will:

  1. Load the multimodal dataset with all sensor modalities
  2. Run YOLOv8 detection on each frame for component localization
  3. Execute force-controlled assembly in PyBullet simulation
  4. Perform CNN-based visual inspection on assembled products
  5. Calculate comprehensive performance metrics
  6. Generate detailed reports and leaderboards

Analyze Results

Results are available in the output directory (/ianvs/industrialEI_workspace) as defined in benchmarkingjob.yaml.

Comprehensive Performance Report

╔═══════════════════════════════════════════════════════════════════════════╗
║ 🎯 EVALUATION COMPLETE ║
║ ║
║ ► Overall Accuracy Score: 6400 ║
║ ► Overall Accuracy Percentage: 64.00% ║
║ ► Detection mAP50: 91.19% ║
║ ► Assembly Success Rate: 83.33% ║
║ ► Total Frames Processed: 150 ║
║ ► Successful Assemblies: 125 ║
║ ║
║ 🏆 Final Combined Score: 0.7759 (77.59%) ║
╚═══════════════════════════════════════════════════════════════════════════╝

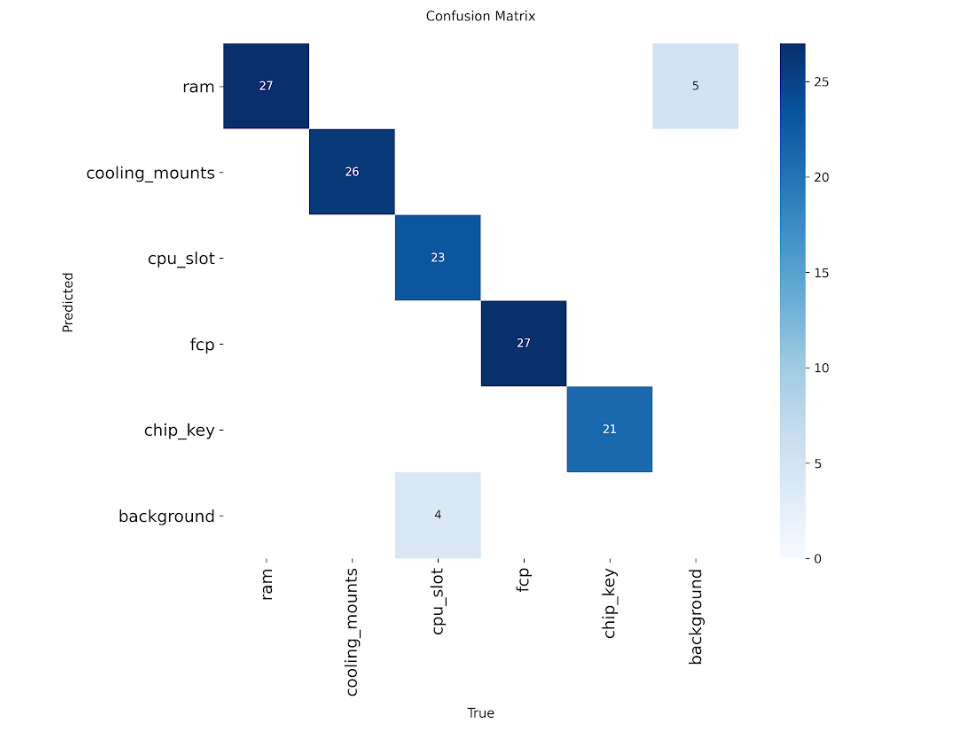
Per-Component Performance Metrics

┌───────────────┬────────┬──────┬───────┬───────┬───────┬───────┬────────┬───────┐
│ Component │ Frames │ Imgs │ Prec% │ Rec% │ mAP50 │ mAP95 │ Acc% │ Succ% │
├───────────────┼────────┼──────┼───────┼───────┼───────┼───────┼────────┼───────┤
│ ram │ 30 │ 136 │ 94.1 │ 73.5 │ 89.4 │ 62.5 │ 60.0 │ 83.3 │
│ cooling_mounts│ 30 │ 120 │ 99.6 │ 99.2 │ 99.5 │ 91.8 │ 65.0 │ 83.3 │
│ cpu_slot │ 30 │ 150 │ 99.3 │ 80.0 │ 82.5 │ 72.4 │ 55.0 │ 83.3 │
│ fcp │ 30 │ 150 │ 96.1 │ 81.7 │ 88.2 │ 75.9 │ 70.0 │ 83.3 │
│ chip_key │ 30 │ 120 │ 99.6 │ 99.2 │ 99.5 │ 95.7 │ 70.0 │ 83.3 │
╞═══════════════╪════════╪══════╪═══════╪═══════╪═══════╪═══════╪════════╪═══════╡
║ OVERALL ║ 150 ║ 676 ║ 97.7 ║ 85.9 ║ 91.2 ║ 78.8 ║ 64.0 ║ 83.3 ║
└───────────────┴────────┴──────┴───────┴───────┴───────┴───────┴────────┴───────┘

Metric Definitions:

  • Frames: Number of test frames processed
  • Images: Number of training images used
  • Prec%: Detection precision (true positives / predicted positives)
  • Rec%: Detection recall (true positives / actual positives)
  • mAP50: Mean Average Precision at IoU threshold 0.50
  • mAP95: Mean Average Precision at IoU 0.50:0.95 range
  • Acc%: Assembly accuracy (weighted combination of position, orientation, deformation control, and force feedback)
  • Succ%: Binary assembly success rate

Training Performance Analysis

The benchmark provides comprehensive training visualizations:

Matplotlib curves:

F1-Score vs Confidence

F1-Confidence Curve 
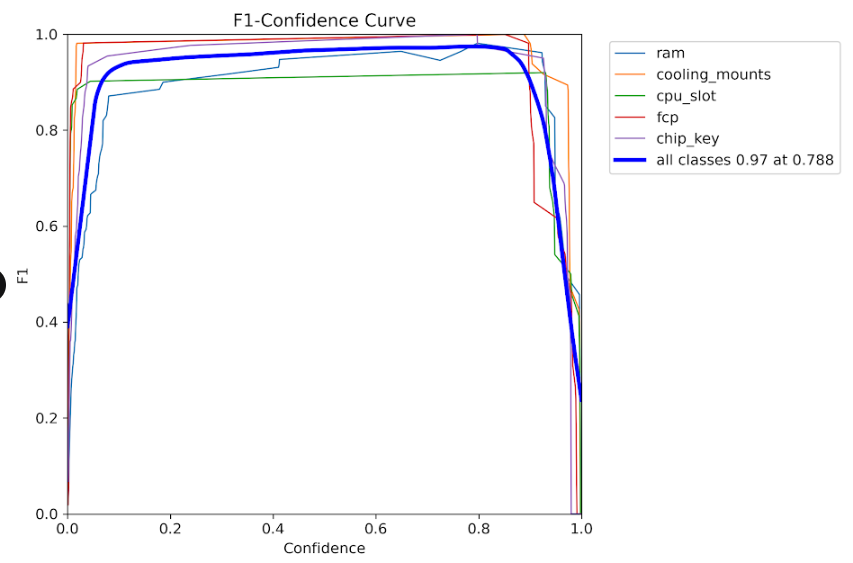
Optimal F1-score achieved at confidence threshold of ~0.5

Precision vs Confidence

Precision-Confidence Curve 
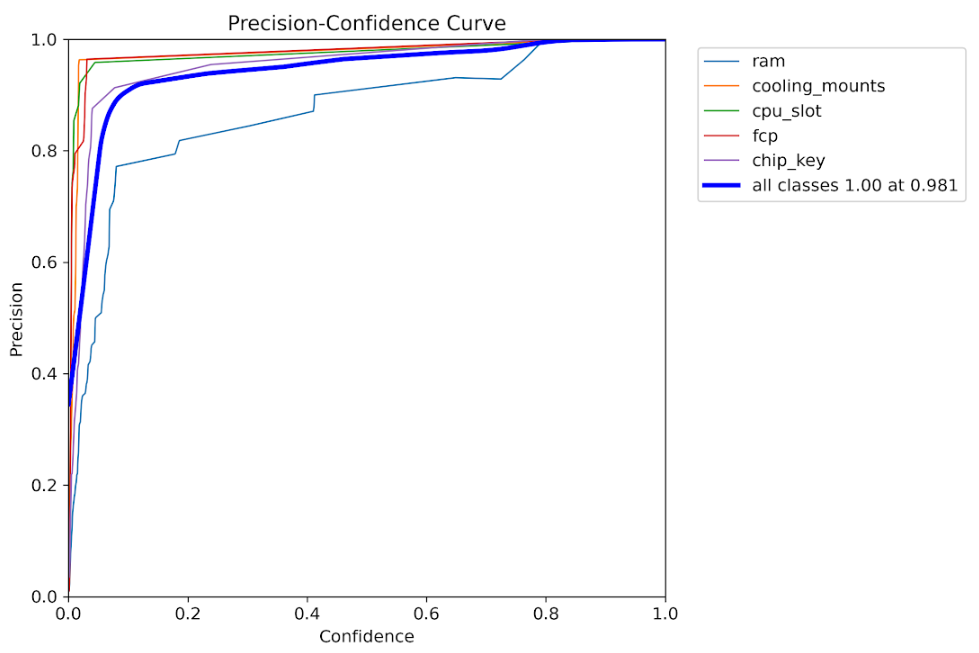
High precision maintained across various confidence levels

Precision-Recall Curve

Precision-Recall Curve 
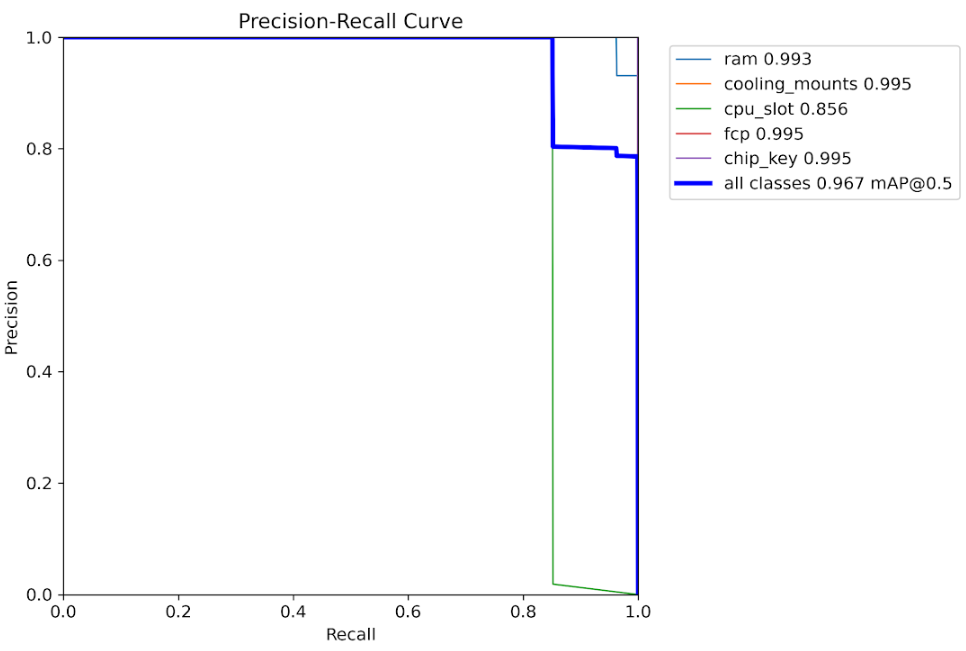
Trade-off analysis between precision and recall metrics

Recall vs Confidence

Recall-Confidence Curve 
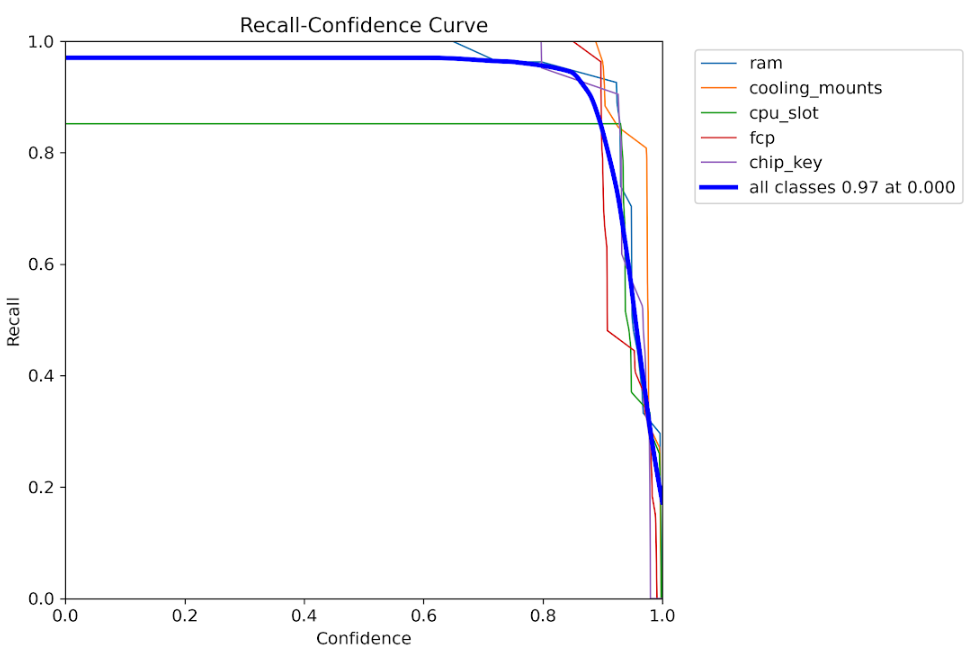
Recall performance across different detection thresholds

Label Distribution

Labels Distribution 
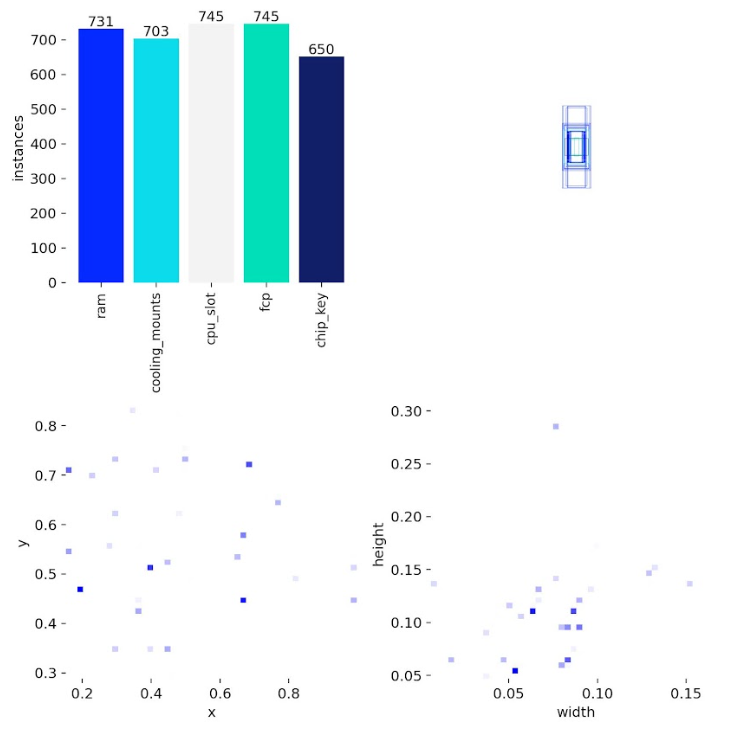
Distribution of component classes across the training dataset

Label Correlation Matrix

Label Correlations Spatial correlation analysis between different component types

🔍 YOLO Detection Predictions

Real-world inference results on test images showing deformable component detection:

YOLO Predictions - Sample 1 YOLO Predictions - Sample 2 YOLO Predictions - Sample 3

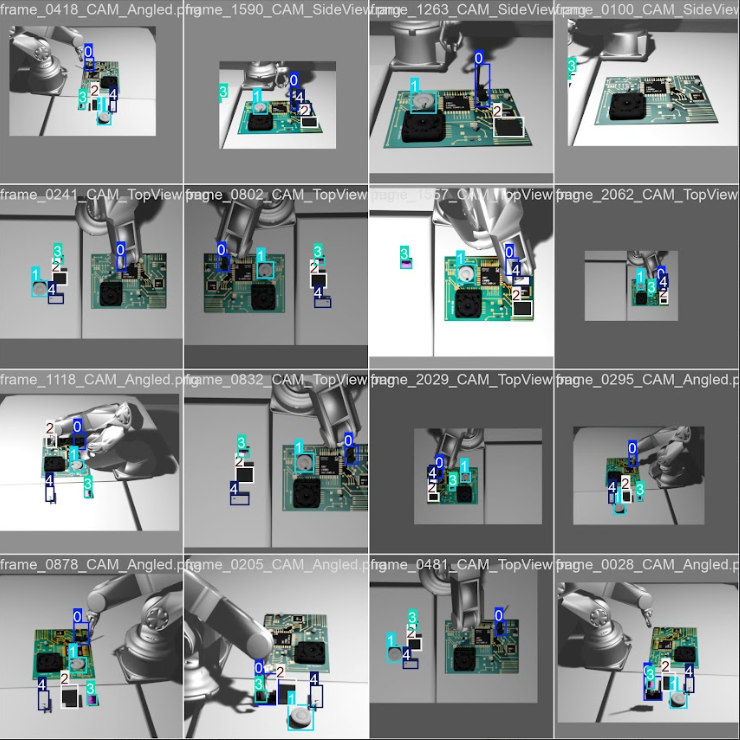
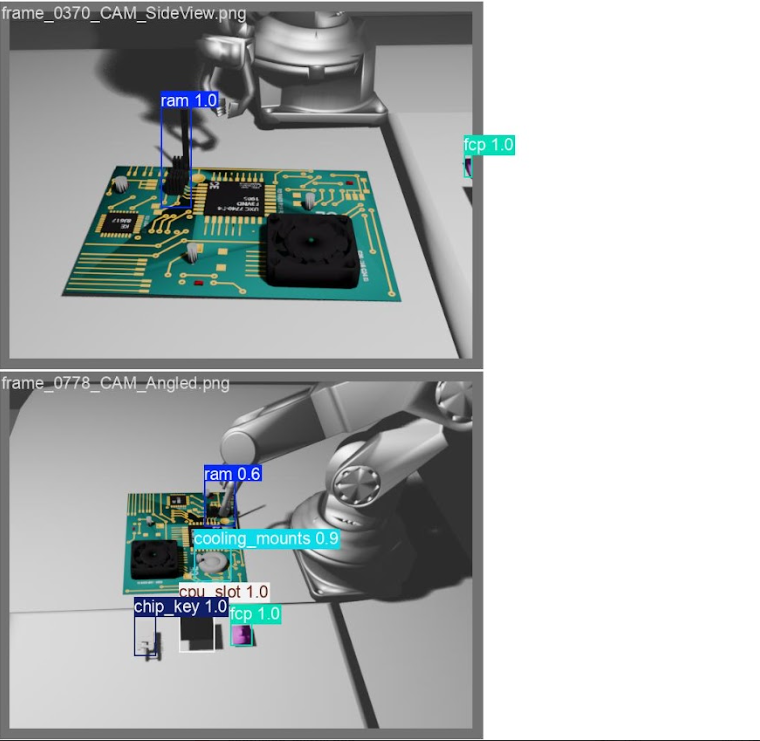
Model successfully detects RAM modules, cooling mounts, CPU slots, FCPs, and chip keys with accurate bounding boxes*

Key training insights:

  • F1-Score vs Confidence: Optimal performance at ~0.5 confidence threshold
  • Precision-Recall Trade-off: High precision maintained across recall ranges
  • Loss Convergence: Stable training with consistent loss reduction

Validation Results

These visualizations demonstrate the model's capability to accurately detect and localize components across diverse assembly scenarios.


Key Achievements and Community Impact

This embodied intelligence benchmarking framework delivers significant value to the industrial AI community:

1. Comprehensive Multimodal Dataset

A publicly available dataset containing:

  • 2,227 annotated frames across 5 component types
  • RGB-D images with precise calibration
  • Force/torque sensor logs with millisecond precision
  • Complete robot trajectory data
  • Assembly success labels validated against industrial standards

2. End-to-End Evaluation Infrastructure

Unlike existing benchmarks that assess isolated capabilities, this framework evaluates:

  • Complete multi-stage workflows from perception to verification
  • Integration quality between vision and force control
  • Real-world assembly success rates
  • System robustness across component variations

3. Reproducible Baseline Algorithms

Production-ready implementations including:

  • YOLOv8-based component detection achieving 91.19% mAP50
  • Force-controlled manipulation with haptic feedback
  • CNN visual inspection for quality assurance
  • Complete workflow orchestration framework

4. Standardized Performance Metrics

Industry-relevant metrics that capture:

  • Detection accuracy (Precision, Recall, mAP)
  • Assembly quality (position, orientation, deformation control)
  • Overall success rates (83.33% baseline)
  • Combined performance scores for leaderboard rankings

This benchmark enables fair comparison of different embodied intelligence approaches, accelerating innovation in industrial automation.


Technical Insights and Future Directions

The benchmark reveals important insights about industrial embodied intelligence:

Current Capabilities:

  • High detection performance (97.7% precision, 85.9% recall overall)
  • Consistent success rates across component types (83.3%)
  • Robust handling of deformable components (FCP assembly: 70% accuracy)

Improvement Opportunities:

  • RAM module assembly shows lower recall (73.5%), indicating detection challenges with reflective surfaces
  • CPU slot assembly has reduced accuracy (55%), suggesting the need for finer position control
  • Deformable component handling requires enhanced force feedback algorithms

Future Enhancements

The framework is designed to accommodate advanced features:

  • Intelligent decision-making: Conditional logic for accessory selection based on assembly configuration
  • Failure recovery: Adaptive re-planning when initial assembly attempts fail
  • Complex workflows: Multi-robot coordination for larger assemblies
  • Transfer learning: Cross-component generalization to reduce training requirements

For more technical details and ongoing development, see the project repository and subscribe to updates.


Getting Started with Your Own Benchmarks

This framework is designed for extensibility. To create your own industrial assembly benchmarks:

  1. Collect your dataset: Use the provided PyBullet simulation scripts or capture real robot data
  2. Define your metrics: Customize testenv/acc.py for scenario-specific evaluation
  3. Implement algorithms: Follow the module interface in components/ for perception and manipulation
  4. Configure Ianvs: Adapt testenv.yaml and benchmarkingjob.yaml for your environment
  5. Run and compare: Execute benchmarks and contribute results to the community leaderboard

The complete documentation, dataset access, and baseline implementations are available in the Ianvs repository.


Video Explanation

Industrial Embodied Intelligence Dataset(CNCF'LFX 25@kubeedge8739 )Project Explanation


Conclusion

This work is part of the KubeEdge-Ianvs distributed synergy AI benchmarking initiative, advancing the state of cloud-edge collaborative intelligence for industrial applications.

Author: Ronak Raj


· 4 min read

On Nov 4, 2025, KubeEdge released v1.22.

1.22 What's New

Release Highlights

Add Hold/Release Mechanism for Controlling Edge Resource Updates

In applications such as autonomous driving, drones, and robotics, we want to control when updates to edge resources occur, ensuring that these resources cannot be updated without the permission of the edge administrator. In v1.22.0, we introduced a hold/release mechanism to control updates to edge resources.

On the cloud side, users can indicate that the corresponding Pod should be held on the edge by adding the annotation edge.kubeedge.io/hold-upgrade: "true" to resources like Deployment, StatefulSet, and DaemonSet.

On the edge, Pods marked with edge.kubeedge.io/hold-upgrade: "true" will be temporarily held and not processed. Edge administrators can release the lock on the Pod to complete the resource update by executing the following command:

keadm ctl unhold-upgrade pod <pod-name>

Alternatively, they can execute the following command to unlock all held edge resources on the edge node:

keadm ctl unhold-upgrade node
note

Using the keadm ctl command requires the DynamicController and MetaServer switches to be enabled.

Refer to the link for more details.(#6348, #6418)

Beehive Framework Upgrade, Supporting Configurable Submodule Restart Policies

In release 1.17, we implemented auto-restart for the EdgeCore modules, allowing global configuration of edge modules restarts. In release 1.22, we optimized the Beehive framework to support restart policy configurations for edge submodules. We also standardized the error handling for starting Beehive submodules.

Refer to the link for more details.(#6444, #6445)

Device Model Update Based On Thing Model and Product Concept

The current Device Model is designed based on the thing model concept. In traditional IoT, devices are usually designed with a three-tier structure: thing model, product, and device instance, which can lead to user confusion during actual use.

In release 1.22, we upgraded the device model design by integrating the concepts of thing models and actual products. We extracted the protocolConfigData and visitors fields from existing device instances into the device model, allowing device instances to share these model configurations. Additionally, to reduce the cost of separating models, device instances can override these configurations.

Refer to the link for more details.(#6457, #6458)

Add Featuregates for Pod Resources Server and CSI Plugin in EdgeCore Integrated Lightweight Kubelet

In previous versions, we removed the Pod Resources Server capability from the integrated lightweight Kubelet in EdgeCore. However, in some use cases, users wish to restore this capability for monitoring Pods. Additionally, the default activation of the CSI Plugin in Kubelet can lead to failures in offline environments due to failed CSINode creation when starting EdgeCore.

In v1.22.0, we added featuregates for the Pod Resources Server and CSI Plugin in the lightweight Kubelet. If you need to enable the Pod Resources Server or disable the CSI Plugin, you can add the following feature gates to your EdgeCore configuration:

apiVersion: edgecore.config.kubeedge.io/v1alpha2
kind: EdgeCore
modules:
edged:
tailoredKubeletConfig:
featureGates:
KubeletPodResources: true
DisableCSIVolumePlugin: true
...

Refer to the link for more details.(kubeedge/kubernetes#12, kubeedge/kubernetes#13, #6452)

C language Mapper-Framework Support

In v1.20.0, we added a Java version of the Mapper-Framework based on the existing Go language version. Due to the diversity of communication protocols for edge IoT devices, many edge device driver protocols are implemented in C. Thus, in the new release, KubeEdge offers a C language version of the Mapper-Framework. Users can access the feature-multilingual-mapper-c branch in the KubeEdge main repository to generate custom Mapper projects in C using the Mapper Framework.

Refer to the link for more details.(#6405, #6455)

Upgrade Kubernetes Dependency to v1.31.12

Upgrade the vendored kubernetes version to v1.31.12, users are now able to use the feature of new version on the cloud and on the edge side.

Refer to the link for more details.(#6443)

· 4 min read

On June 28, 2025, KubeEdge released v1.21.

1.21 What's New

Release Highlights

New Generation Node Task API and Implementation

In v1.21, we redesigned the status structure and operation process of node jobs to track error information and facilitate developers' understanding. In the new design, the node job status includes Phase (Init, InProgress, Completed, Failure) and nodeStatus. The nodeStatus consists of Phase (Pending, InProgress, Successful, Failure, Unknown), actionFlow, nodeName, reason, and business-related fields. A YAML example of the NodeUpgradeJob status is provided below.

status:
nodeStatus:
- actionFlow:
- action: Check
status: 'True'
time: '2025-05-28T08:12:01Z'
- action: WaitingConfirmation
status: 'True'
time: '2025-05-28T08:12:01Z'
- action: Backup
status: 'True'
time: '2025-05-28T08:12:01Z'
- action: Upgrade
status: 'True'
time: '2025-05-28T08:13:02Z'
currentVersion: v1.21.0
historicVersion: v1.20.0
nodeName: ubuntu
phase: Successful
phase: Completed

Refer to the link for more details.(#6082, #6084)

Support Closed Loop Flow Control

In v1.21, we have optimized the traffic closed-loop function of node groups. Applications within a node group can only access application services within the same group and unable to access services of other node groups. With this mechanism, users can easily achieve network isolation between multiple edge regions, ensuring that application services in different regions do not interfere with each other.

Refer to the link for more details.(#6097, #6077)

Support Update Edge Configuration from Cloud

In many cases, cloud-based direct updates to EdgeCore configuration files for edge nodes offer greater convenience than manual updates from edge node, especially for batch operations that boost efficiency by managing multiple nodes simultaneously.

In v1.21.0, ConfigUpdateJob CRD is introduced to allows users to update configuration files for edge nodes in the cloud. The updateFields within the CRD is used to specify the configuration items that need to be updated.

CRD Sample:

apiVersion: operations.kubeedge.io/v1alpha2
kind: ConfigUpdateJob
metadata:
name: configupdate-test
spec:
failureTolerate: "0.3"
concurrency: 1
timeoutSeconds: 180
updateFields:
modules.edgeStream.enable: "true"
labelSelector:
matchLabels:
"node-role.kubernetes.io/edge": ""
node-role.kubernetes.io/agent: ""
note
  • This feature is disabled by default in v1.21.0. To enable it, please start the ControllerManager and TaskManager at cloud, as well as the TaskManager edge.
  • Updating edge configurations will require a restart of EdgeCore.

Refer to the link for more details.(#6338)

Support One-Click Deployment of Dashboard and Integration of kubeedge/keink

In v1.21, the dashboard functionality has been enhanced by designing a BFF (Backend for Frontend) layer to connect the frontend user interface layer with the KubeEdge backend API. Additionally, the dashboard is integrated with the keink project, allowing users to launch a keink cluster in the dashboard environment with just one command to experience KubeEdge features.

Refer to the link for more details.(#50)

Important Steps before Upgrading

  • From v1.21, the v1alpha2 node job enables by default, and the CRD definition will be backward compatible. If you want to continue to use the v1alpha1 version of the NodeUpgradeJob and ImagePrePullJob, please setting the feature gates of ControllerManager and CloudCore.
    • Add a command arg for ControllerManager:
      --feature-gates=disableNodeTaskV1alpha2
    • Modify the CloudCore configuration:
      apiVersion: cloudcore.config.kubeedge.io/v1alpha2
      kind: CloudCore
      featureGates:
      disableNodeTaskV1alpha2: true
      ...
note

The node job v1alpha2 CRDs are compatible with v1alpha1, but they cannot be switched between them. The code logic of v1alpha1 will destroy the data of v1alpha2 node job CR.

The v1alpha1 node jobs will no longer be maintained, and relevant codes will be clean up after v1.23. In addition, the node job has become a default disabled Beehive module in EdgeCore. If you want to use the node jobs, please modify the edgecore.yaml to enable it.

  modules:
...
taskManager:
enable: true
  • From v1.21, keadm upgrade related commands(backup, upgrade, rollback) at the edge have been adjusted.
    • The upgrade command will not automatically execute the backup. The backup command needs to be triggered manually.
    • The upgrade command hides business-related flags and relevant codes will be cleaned up after v1.23.
    • All upgrade related commands use level 3 commands:
    keadm edge upgrade
    keadm edge backup
    keadm edge rollback

· 6 min read

On January 21, 2025, KubeEdge released v1.20. The new release has enhanced the capabilities of managing and operating edge nodes and applications for large-scale, offline and other edge scenarios. At the same time, it has added support for the multi-language Mapper-Framework.

1.20 What's New

Release Highlights

Support Batch Node Process

Previously, the keadm tool of KubeEdge only supports manual single-node management. However, in edge scenarios, the scale of nodes is often very large, and the management process of a single node can no longer cope with such large-scale scenarios.

In v1.20, we have provided the batch node operation and maintenance capability. With this capability, users only need to use one configuration file to perform batch operation and maintenance on all edge nodes through a control node (which can log in to all edge nodes). The supported operation and maintenance capabilities include join, reset, and upgrade.

# Configuration Requirements
keadm:
download:
enable: true # <Optional> Whether to download the keadm package, which can be left unconfigured, default is true. if it is false, the 'offlinePackageDir' will be used.
url: "" # <Optional> The download address of the keadm package, which can be left unconfigured. If this parameter is not configured, the official github repository will be used by default.
keadmVersion: "" # <Required> The version of keadm to be installed. for example: v1.19.0
archGroup: # <Required> This parameter can configure one or more of amd64/arm64/arm.
- amd64
offlinePackageDir: "" # <Optional> The path of the offline package. When download.enable is true, this parameter can be left unconfigured.
cmdTplArgs: # <Optional> This parameter is the execution command template, which can be optionally configured and used in conjunction with nodes[x].keadmCmd.
cmd: "" # This is an example parameter, which can be used in conjunction with nodes[x].keadmCmd.
token: "" # This is an example parameter, which can be used in conjunction with nodes[x].keadmCmd.
nodes:
- nodeName: edge-node # <Required> Unique name, used to identify the node
arch: amd64 # <Required> The architecture of the node, which can be configured as amd64/arm64/arm
keadmCmd: "" # <Required> The command to be executed on the node, can used in conjunction with keadm.cmdTplArgs. for example: "{{.cmd}} --edgenode-name=containerd-node1 --token={{.token}}"
copyFrom: "" # <Optional> The path of the file to be copied from the local machine to the node, which can be left unconfigured.
ssh:
ip: "" # <Required> The IP address of the node.
username: root # <Required> The username of the node, need administrator permissions.
port: 22 # <Optional> The port number of the node, the default is 22.
auth: # Log in to the node with a private key or password, only one of them can be configured.
type: password # <Required> The value can be configured as 'password' or 'privateKey'.
passwordAuth: # It can be configured as 'passwordAuth' or 'privateKeyAuth'.
password: "" # <Required> The key can be configured as 'password' or 'privateKeyPath'.
maxRunNum: 5 # <Optional> The maximum number of concurrent executions, which can be left unconfigured. The default is 5.`

# Configuration Example
keadm:
download:
enable: true
url: https://github.com/kubeedge/kubeedge/releases/download/v1.20.0 # If this parameter is not configured, the official github repository will be used by default
keadmVersion: v1.20.0
archGroup: # This parameter can configure one or more of amd64\arm64\arm
- amd64
offlinePackageDir: /tmp/kubeedge/keadm/package/amd64 # When download.enable is true, this parameter can be left unconfigured
cmdTplArgs: # This parameter is the execution command template, which can be optionally configured and used in conjunction with nodes[x].keadmCmd
cmd: join --cgroupdriver=cgroupfs --cloudcore-ipport=192.168.1.102:10000 --hub-protocol=websocket --certport=10002 --image-repository=docker.m.daocloud.io/kubeedge --kubeedge-version=v1.20.0 --remote-runtime-endpoint=unix:///run/containerd/containerd.sock
token: xxx
nodes:
- nodeName: ubuntu1 # Unique name
arch: amd64
keadmCmd: '{{.cmd}} --edgenode-name=containerd-node1 --token={{.token}}' # Used in conjunction with keadm.cmdTplArgs
copyFrom: /root/test-keadm-batchjoin # The file directory that needs to be remotely accessed to the joining node
ssh:
ip: 192.168.1.103
username: root
auth:
type: privateKey # Log in to the node using a private key
privateKeyAuth:
privateKeyPath: /root/ssh/id_rsa
- nodeName: ubuntu2
arch: amd64
keadmCmd: join --edgenode-name=containerd-node2 --cgroupdriver=cgroupfs --cloudcore-ipport=192.168.1.102:10000 --hub-protocol=websocket --certport=10002 --image-repository=docker.m.daocloud.io/kubeedge --kubeedge-version=v1.20.0 --remote-runtime-endpoint=unix:///run/containerd/containerd.sock # Used alone
copyFrom: /root/test-keadm-batchjoin
ssh:
ip: 192.168.1.104
username: root
auth:
type: password
passwordAuth:
password: *****
maxRunNum: 5

# Usage
keadm batch -c config.yaml

Refer to the link for more details.(#5988, #5968)

Multi-language Mapper-Framework Support

To further reduce the complexity of developing custom Mapper, in this version, KubeEdge provides the Java version of Mapper-Framework. Users can access the KubeEdge feature-multilingual-mapper branch to use Mapper-Framework to generate a Java version of custom Mapper project.

Refer to the link for more details.(#5773, #5900)

Support Pods logs/exec/describe and Devices get/edit/describe Operation at Edge Using keadm ctl

In v1.17, a new command keadm ctl has been introduced to support pods query and restart at Edge. In this release, keadm ctl supports more functionality including pod logs/exec/describe and device get/edit/describe to help users operate resources at edge, especially in offline scenarios.

[root@edgenode1 ~]# keadm ctl -h
Commands operating on the data plane at edge

Usage:
keadm ctl [command]

Available Commands:
...
describe Show details of a specific resource
edit Edit a specific resource
exec Execute command in edge pod
get Get resources in edge node
logs Get pod logs in edge node
...

Refer to the link for more details.(#5752, #5901)

Decouple EdgeApplications from NodeGroups, Support Node Label Selector

EdgeApplication can be overrides deployment spec(i.e. replicas, image, commands and environments) via the node group, and pod traffics are closed-loop in a node group(Deployments managed by EdgeApplication share a Service). But in the real scenario, the scope of nodes that need batch operations is different from that of nodes that need to collaborate with each other.

We add a new targetNodeLabels field for node label selectors in the EdgeApplication CRD, this field will allow the application to deploy based on node labels and apply overrides specific to those nodes.

apiVersion: apps.kubeedge.io/v1alpha1
kind: EdgeApplication
metadata:
name: edge-app
namespace: default
spec:
replicas: 3
image: my-app-image:latest
# New field: targetNodeLabels
targetNodeLabels:
- labelSelector:
- matchExpressions:
- key: "region"
operator: In
values:
- "HangZhou"
overriders:
containerImage:
name: new-image:latest
resources:
limits:
cpu: "500m"
memory: "128Mi"

Refer to the link for more details.(#5755, #5845)

CloudHub-EdgeHub Supports IPv6

We provide a configuration guide in the documentation on the official website, which is how KubeEdge enables the cloud-edge hub to support IPv6 in a K8s cluster.

Refer to the document https://kubeedge.io/docs/advanced/support_ipv6

Upgrade Kubernetes Dependency to v1.30.7

Upgrade the vendered kubernetes version to v1.30.7, users are now able to use the feature of new version on the cloud and on the edge side.

Refer to the link for more details. (#5997)

Important Steps before Upgrading

  • From v1.20, the default value for the EdgeCore configuration option edged.rootDirectory will change from /var/lib/edged to /var/lib/kubelet. If you wish to continue using the original path, you can set --set edged.rootDirectory=/var/lib/edged when installing EdgeCore with keadm.

· 3 min read

In KubeEdge v1.19, we introduced a new version of the KubeEdge Dashboard. This version of KubeEdge Dashboard is built with the Next.js framework and the MUI component library to offer better performance. Meanwhile, we have optimized and enhanced several modules of the KubeEdge Dashboard, including the device management and device model management modules.

In this article, we will introduce how to deploy and use the KubeEdge Dashboard.

Environment Pre-requisites

We can obtain the source code of KubeEdge Dashboard from the KubeEdge Dashboard GitHub repository. Before building and deploying KubeEdge Dashboard, please ensure the following environment is set up:

  • KubeEdge Cluster: Please refer to the KubeEdge official documentation to set up a KubeEdge cluster. KubeEdge Dashboard requires KubeEdge v1.15 or later versions.
  • Node.js: Install Node.js on your system, it is recommended to use Node.js v18 or later versions.
  • Node.js Package Manager: Install a Node.js package manager, such as npm, yarn, or pnpm.

Building and Deploying

Once the environment is set up and the KubeEdge Dashboard source code has been downloaded, we can use the Node.js package manager to start the KubeEdge Dashboard. In the following instructions, we will use pnpm as the example to show how to install dependencies and run KubeEdge Dashboard.

First of all, we need to install the dependencies:

pnpm install

KubeEdge Dashboard interacts with KubeEdge resources via the Kubernetes API. Therefore, we need to set the API_SERVER environment variable to specify the API Server address:

pnpm run build
API_SERVER=https://192.168.33.129:6443 pnpm run start

After starting KubeEdge Dashboard, open http://localhost:3000 in your browser to access the dashboard.

For the KubeEdge cluster with self-signed certificates, we need to set the NODE_TLS_REJECT_UNAUTHORIZED=0 environment variable to bypass certificate verification:

NODE_TLS_REJECT_UNAUTHORIZED=0 API_SERVER=<api-server> pnpm run start

Creating a Login Token

To authenticate with KubeEdge Dashboard, we need to create a token for login. The following instructions show how to create a service account dashboard-user in the kube-system namespace and generate a token for authentication.

First, we need to create a service account in the Kubernetes cluster:

kubectl create serviceaccount dashboard-user -n kube-system

To grant permissions to the service account, we need to create a cluster role binding that associates the service account with a cluster role. Kubernetes provides some built-in cluster roles, such as cluster-admin, which has access to all resources in the cluster. We can also refer to the Kubernetes documentation to create a custom cluster role if needed.

kubectl create clusterrolebinding dashboard-user-binding --clusterrole=cluster-admin --serviceaccount=kube-system:dashboard-user -n kube-system

Since Kubernetes v1.24, secrets for service accounts are no longer created automatically. We need to create an associated token by the kubectl create token command. The lifetime of the token will be determined by the server automatically, and we can specify the lifetime of the token by the --duration option.

kubectl create token dashboard-user -n kube-system

For Kubernetes v1.23 and earlier versions, Kubernetes automatically creates a secret for the service account. We can retrieve the secret by the kubectl describe secret command:

kubectl describe secret -n kube-system $(kubectl get secret -n kube-system | grep dashboard-user | awk '{print $1}')

Conclusion

With KubeEdge Dashboard, we can more easily manage KubeEdge resources such as edge applications and devices. We will continue to enhance and optimize the KubeEdge Dashboard and user experience in future releases. We also welcome feedback and suggestions from the community.

For more information on KubeEdge Dashboard, please refer to the KubeEdge Dashboard GitHub repository.